Overview
Based on Intel® Edge Insights for Fleet (EIF) framework, Address Recognition and Analytics Reference Implementation delivers DL models, computer vision algorithms, OpenVINO™ toolkit, Edge2Cloud connectivity, and other software dependencies that will detect address plaques on the surfaces of buildings and records the addresses on the plaques.
Select Configure & Download to download the reference implementation and the software listed below.
Legal Disclaimers
Recipient is solely responsible for compliance with all applicable regulatory standards and safety, privacy, and security related requirements concerning Recipient's use of the Intel hardware and software.
Recipient is solely responsible for any and all integration tasks, functions, and performance in connection with use of the Intel hardware or software as part of a larger system. Intel does not have sufficient knowledge of any adjoining, connecting, or component parts used with or possibly impacted by the Intel hardware or software or information about operating conditions or operating environments in which the Intel hardware or software may be used by Recipient. Intel bears no responsibility, liability, or fault for any integration issues associated with the inclusion of the Intel hardware or software into a system. It is Recipient’s responsibility to design, manage, and assure safeguards to anticipate, monitor, and control component, system, quality, and or safety failures.
- Time to Complete: Approximately 60 minutes
- Programming Language: Python*
- Available Software: Intel® Distribution of OpenVINO™ toolkit 2021.4.2 Release
Recommended Hardware
The below hardware is recommended for use with this reference implementation. For other suggestions, see Recommended Hardware.
Target System Requirements
-
Ubuntu* 20.04 LTS
-
6th to 10th Generation Intel® Core™ processors with Intel® Iris® Plus graphics or Intel® HD Graphics
How It Works
The reference implementation contains a full pipeline of analytics on video streams from a camera that is mounted on the side of a last mile delivery vehicle. The camera is connected to an in-vehicle Edge PC based on the Intel® Core™ processor or Intel Atom® processor. When the vehicle stops, it detects address plaques on the surfaces of buildings and records the addresses on the plaques.
This reference implementation contains a notification subsystem which includes a cloud dashboard and a cloud storage.

Figure 1: Architecture Diagram
Get Started
Step 1: Install the Reference Implementation
Select Configure & Download to download the reference implementation and then follow the steps below to install it.
NOTE: The images provided in the reference implementation are ONLY to be used for validating the accuracy of detection events.
NOTE: If the host system already has Docker* images and containers, you might encounter errors while building the reference implementation packages. If you do encounter errors, refer to the Troubleshooting section at the end of this document before starting the reference implementation installation.
-
Open a new terminal, go to the downloaded folder and unzip the downloaded RI package.
unzip address_recognition_and_analytics.zip -
Go to the
address_recognition_and_analytics.zip/directory.cd address_recognition_and_analytics.zip/ -
Change permission of the executable
edgesoftwarefile.chmod 755 edgesoftware -
Run the command below to install the Reference Implementation.
./edgesoftware install -
During the installation, you will be prompted for the Product Key. The Product Key is contained in the email you received from Intel confirming your download.

Figure 2: Product Key
-
When the installation is complete, you see the message "Installation of package complete" and the installation status for each module.

Figure 3: Installation Success
NOTE: If you encounter any issues, please refer to the Troubleshooting section at the end of this document. Installation failure logs will be available at the path:
/var/log/esb-cli/Address_Recognition_And_Analytics_<version>/output.log -
To start the application, you need to change the directory using the cd command printed at the end of the installation process:
cd /opt/intel/eif/EII-UseCaseManager/
Step 2: Run the Application
Prerequisites
-
Run the application. Copy and run the
make webuicommand from the end of the installation log:`make webui` -
Open the Web UI: Go to 127.0.0.1:9090 on your web browser.

Figure 4: Reference Implementation Dashboard
-
If you installed your ThingsBoard Cloud Server and you have enabled S3 Bucket Server on your AWS account, you can provide your configured AWS Access Key ID, AWS Secret Access Key, Thingsboard IP, Thingsboard Port and Thingsboard Device token on the Cloud Data Configuration tab.
After you complete the Cloud configuration, make sure you click on the Save Credentials and Save Token buttons. Now you can import the ThingsBoard dashboard as described at the end of the Set Up ThingsBoard* Cloud Data to enable all dashboard features, including the cloud storage.

Figure 5: Configuration Tab Contents
NOTE: If you don't have an AWS account, you will not be able to access Storage Cloud. You can still enable the ThingsBoard Cloud Data if you configured it locally or on another machine.
-
Access the Address Recognition and Analytics Dashboard with the following steps.
-
Go to sidebar and select the Run Application menu option.
-
Select the ARA tab on the General Fleet Solution dashbaord.

Figure 6: Select Run Application Menu Option
-
Configure the use case by selecting the video sample and the device for the UDF model.
-
Enter a target address value (for example, 30) to generate the target address reached alert.
-
Optionally, you can also set the simulation data that you want to use. You can choose between using the KnowGo Simulator or simply use the CSV pre-recorded simulation data.
Model Description
Address Detection: This model detects the numbers on an address plaque.
Address Recognition: This model recognizes the target address and sends an alert when the address number is reached.
NOTE: These images are ONLY to be used for validating the accuracy of detection events.

Figure 7: Configure Use Case
-
Click on the Browse button and search for video on the following path:
/opt/intel/eif/EII-UseCaseManager/modules/EII-AddressDetection-UseCase/config/VideoIngestion/test_videos/ -
After selecting the video sample, select the target device for all models. Options include CPU or GPU. Click on Run Application.
-
The application will start the Visualizer App that will detect address plaques on the surfaces of buildings:
NOTE: These images are ONLY to be used for validating the accuracy of detection events.
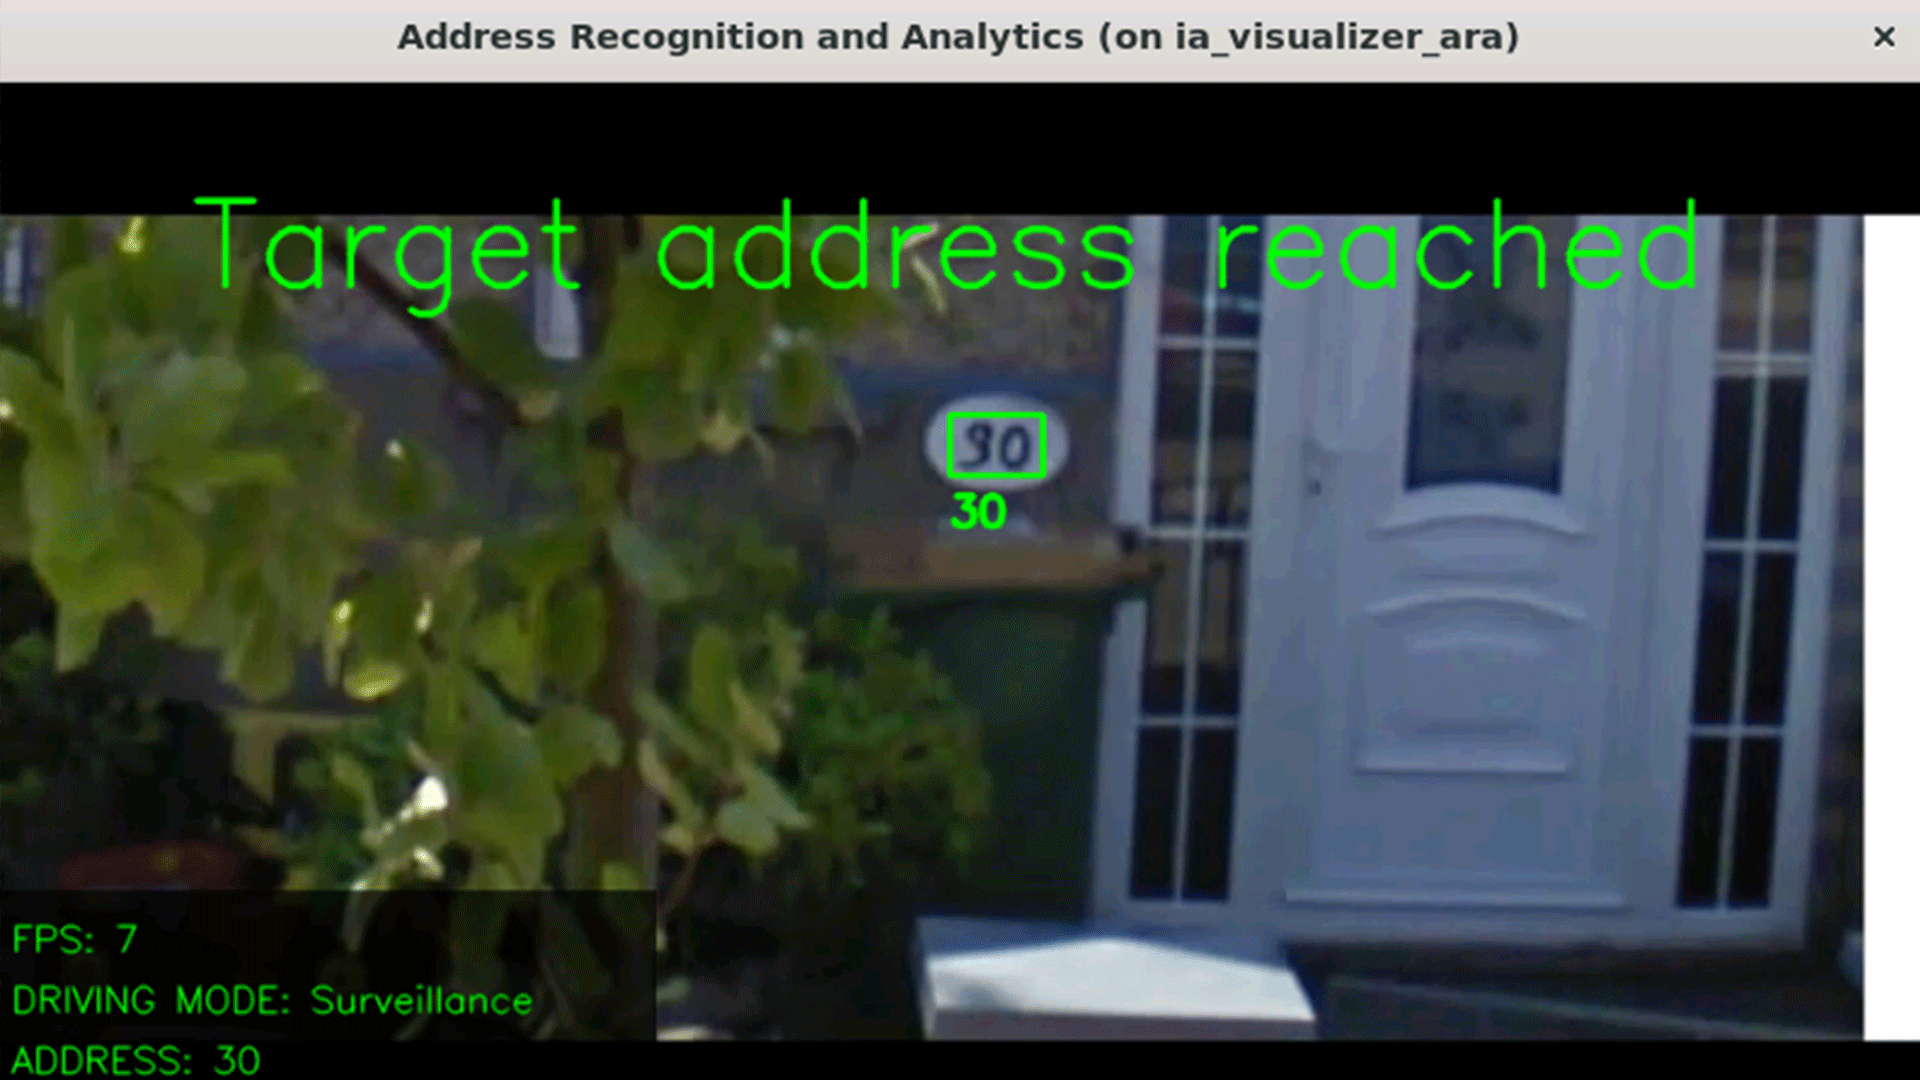
Figure 8: Visualizer Output
-
-
After the visualizer starts, you can go to the ThingsBoard link and check the alerts sent by the reference implementation. If you configured the AWS credentials, you will also have access to video snapshots taken by the application on the video stream.
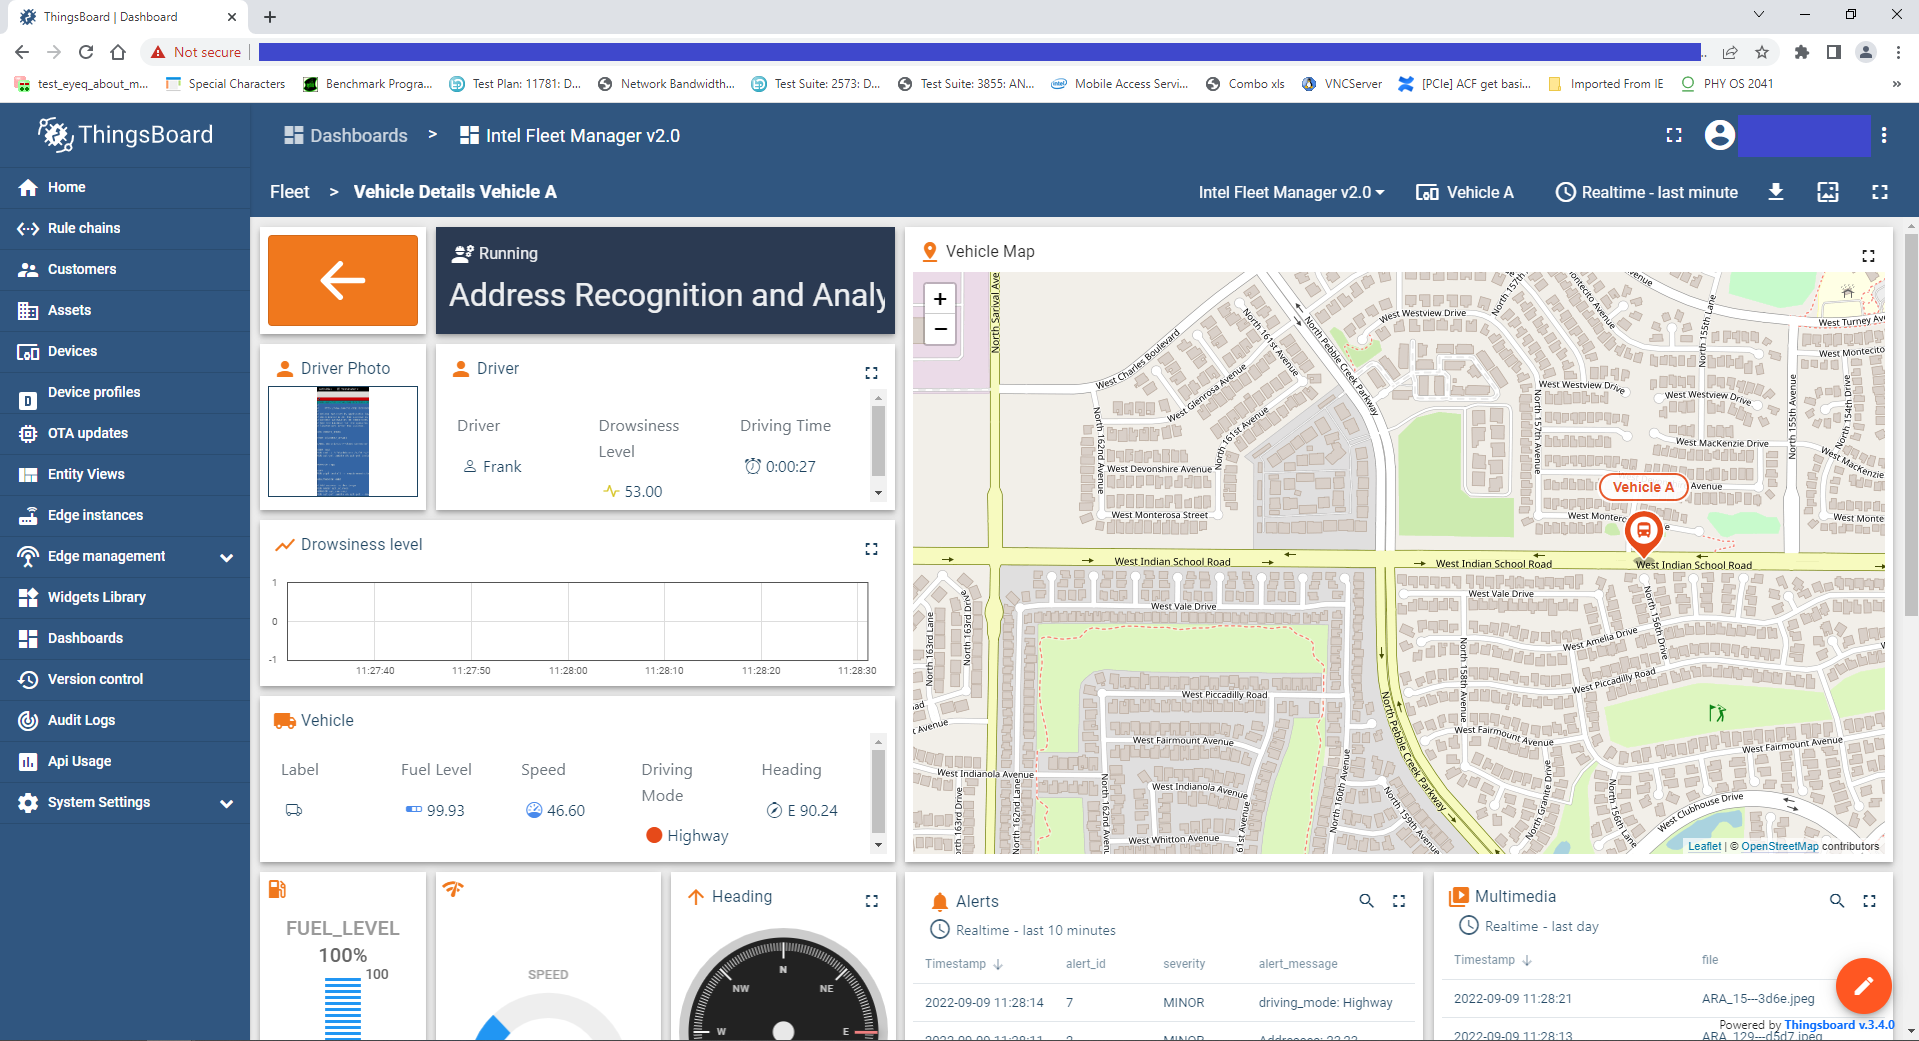
Figure 9: Intel Fleet Manager Dashboard shown in ThingsBoard
-
You can also check the cloud storage from the Storage menu option.
NOTE: These images are ONLY to be used for validating the accuracy of detection events.

Figure 10: Reference Implementation Storage Tab
Run in Parallel with Work Zone Analytics Reference Implementation
To run this task you will need to download and install Work Zone Analytics Reference Implementation.
For more details about parallel execution, see the Edge Insights for Fleet Use Case Manager documentation.
Prerequisites
- Follow the steps to install Work Zone Analytics after installing Address Recognition and Analytics
Steps to Run the Application
-
Change directory to EII-Use Case Manager path on your terminal:
cd /opt/intel/eif/EII-UseCaseManager -
Run the following command on your terminal to start the web server application.
make webui -
Open your browser and go to 127.0.0.1:9090.
-
Configure both installed reference implementations by setting the video source and the target. Click on Run Application.
NOTE: Configure each reference implementation by selecting the desired tab.
For example, click the Run Application menu option, then click on ARA to configure the Address Recognition and Analytics RI.
Next, click on WZA to configure the Work Zone Analytics RI.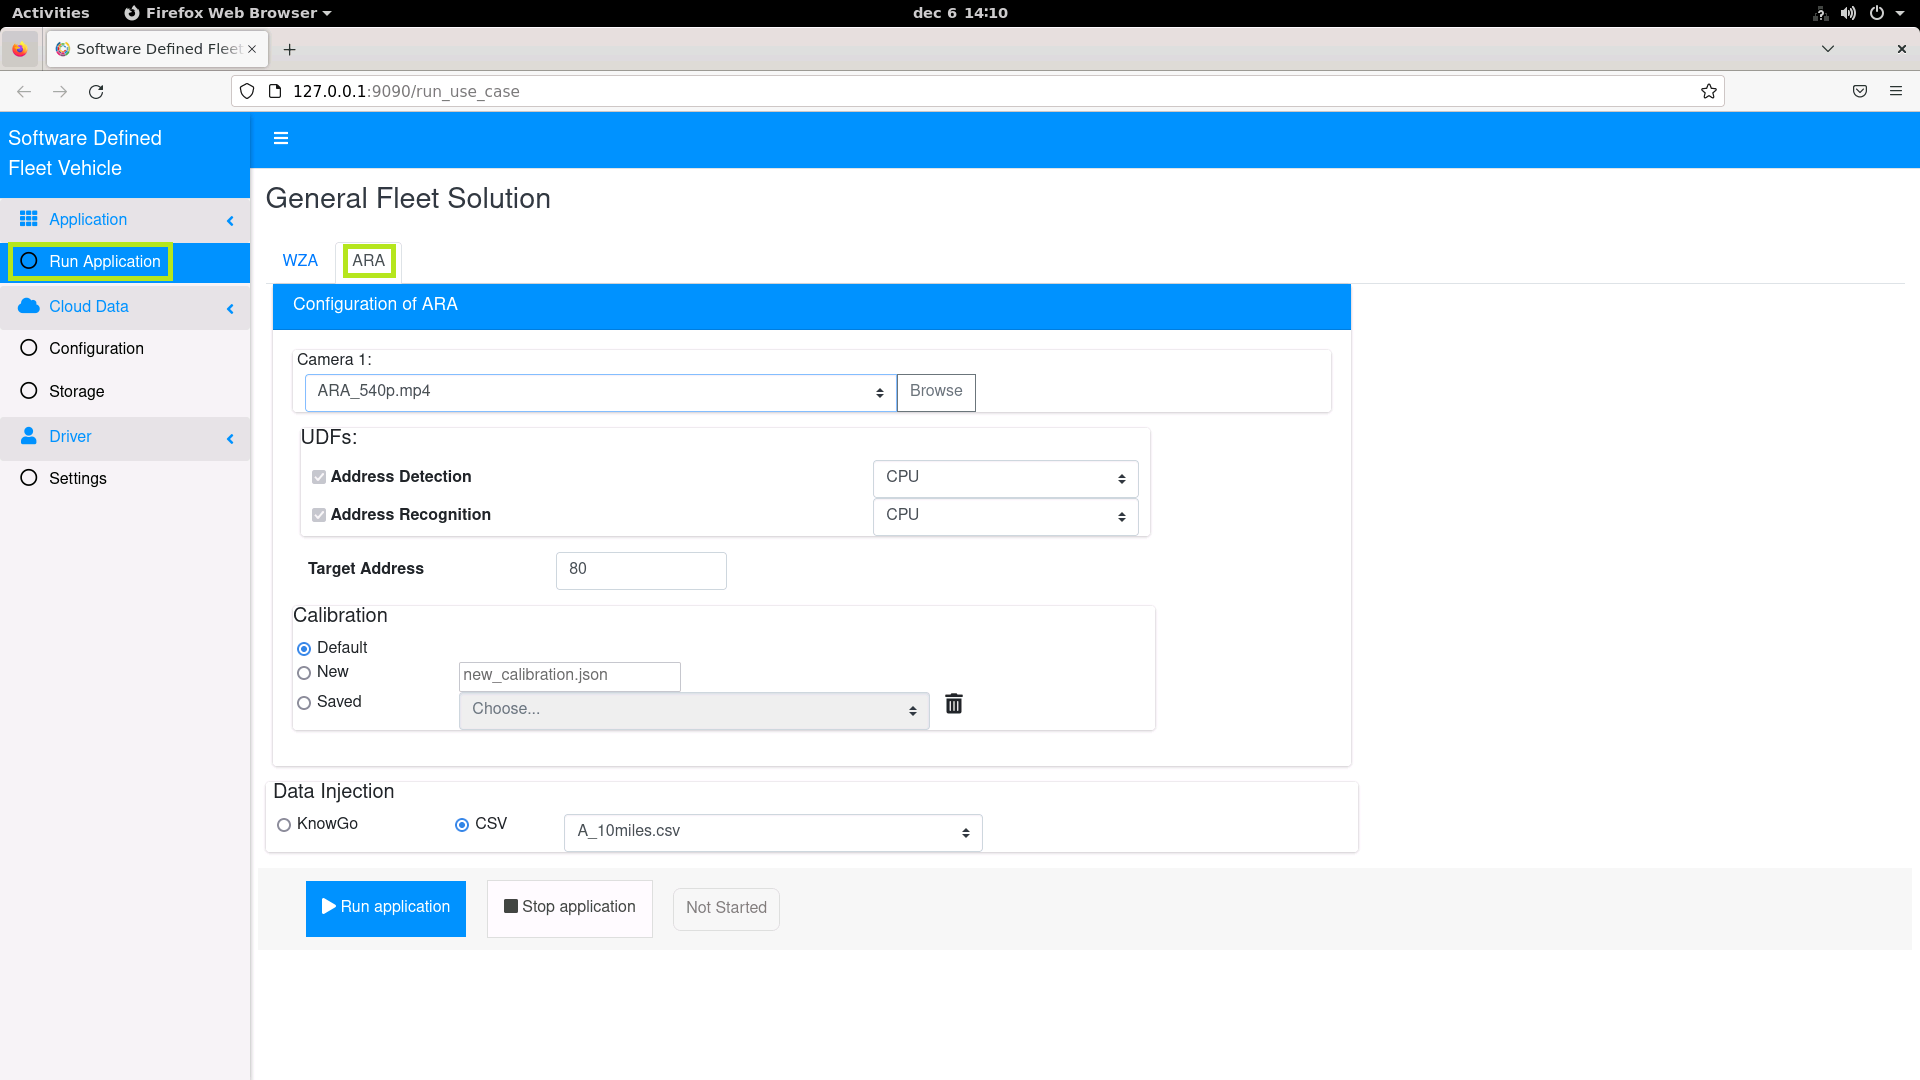
Figure 11: Configure Address Recognition and Analytics Reference Implementation

Figure 12: Configure Work Zone Analytics Reference Implementation
-
Wait for both Visualizers to get up and running.
NOTE: These images are ONLY to be used for validating the accuracy of detection events.

Figure 13: Visualizer Output for 2 Reference Implementations
NOTE: If you reinstall the first reference implementation, you must also reinstall the second one.
Summary and Next Steps
On a last-mile delivery van, a camera is mounted on the side of the vehicle. The camera is connected to an in-vehicle Edge PC based on the Intel® Core™ processor or Intel Atom® processor. When the vehicle stops, it detects address plaques on the surfaces of buildings and records the addresses on the plaques.
As a next step, extend the reference implementation to:
- Collate the address plaque detection outputs with the navigation SW result to detect driver or mapping errors.
- Provide reports and evidence to delivery fleet managers to review if there are package delivery issues.
Learn More
To continue your learning, see the following guides and software resources:
- For additional reference implementations, visit Edge Insights for Fleet.
- Intel® Distribution of OpenVINO™ toolkit documentation
Known Issues
Uninstall Reference Implementation
If you uninstall one of the reference implementations, you need to reinstall the other ones because the Docker images will be cleared.
Troubleshooting
Installation Failure
If the host system already has Docker images and its containers running, you will have issues during the RI installation. You must stop/force stop existing containers and images.
-
To remove all stopped containers, dangling images, and unused networks:
sudo docker system prune --volumes -
To stop Docker containers:
sudo docker stop $(sudo docker ps -aq) -
To remove Docker containers:
sudo docker rm $(sudo docker ps -aq) -
To remove all Docker images:
sudo docker rmi -f $(sudo docker images -aq)
Docker Image Build Failure
If Docker image build on corporate network fails, follow the steps below.
-
Get DNS server using the command:
nmcli dev show | grep 'IP4.DNS' -
Configure Docker to use the server. Paste the line below in the
/etc/docker/daemon.jsonfile:{ "dns": ["<dns-server-from-above-command>"]} -
Restart Docker:
sudo systemctl daemon-reload && sudo systemctl restart docker
Installation Failure Due to Ubuntu Timezone Setting
While building the reference implementation, if you see: /etc/timezone && apt-get install -y tzdata && ln -sf /usr/share/zoneinfo/${HOST_TIME_ZONE} /etc/localtime && dpkg-reconfigure -f noninteractive tzdata' returned a non-zero code: 1 make: *** [config] Error 1
Run the following command in your terminal:
sudo timedatectl set-local-rtc 0
Installation Encoding Issue
While building the reference implementation, if you see: ERROR: 'latin-1' codec can't encode character '\\u2615' in position 3: ordinal not in range(256)
Run the following command in your terminal:
export LANG=en_US.UTF-8
Can't Connect to Docker Daemon
If you can't connect to docker daemon at http+docker://localhost, run the following command in your terminal:
sudo usermod -aG docker $USER
Log out and log back in to Ubuntu.
Check before retrying to install if group docker is available for you by running the following command in a terminal:
groups
The output should contain “docker”.
Installation Timeout When Using pip or apt Commands
You may experience a timeout issue when using the People's Republic of China (PRC) internet network.
Make sure that you have a stable internet connection while installing the packages. If you experience timeouts due to Linux* apt or Python* pip installation, try to reinstall the package.
Support Forum
If you're unable to resolve your issues, contact the Support Forum.