This article introduces a new implementation of the effect called adaptive screen space ambient occlusion (ASSAO), which is specially designed to scale from low-power devices and scenarios up to high-end desktops at high resolutions, all under one implementation with a uniform look, settings, and quality that is equal to the industry standard.
Screen space ambient occlusion (SSAO) is a popular effect used in real-time rendering to produce small-scale ambient effects and contact shadow effects. It is used by many modern game engines, typically using 5 percent to 10 percent of the frame GPU time. Although a number of public implementations already exist, not all are open source or freely available, or provide the level of performance scaling required for both low-power mobile and desktop devices. This is where ASSAO fills needed gaps.
This article focuses on how to understand the sample code and to further integrate or port the sample code. It also covers implementation specifics, available options, settings and trade-offs in its use. An article detailing the implementation is featured in the upcoming book GPU Zen (GPU Pro* 8).

Figure 1. Example of adaptive SSAO applied to a test scene in Unity 4*.
Full DirectX* 11 implementation is provided under MIT license in an easy-to-integrate package.
Algorithm Overview
ASSAO is a SSAO implementation tuned for scalability and flexibility. Ambient occlusion (AO) implementation is based on a solid-angle occlusion model similar to “Horizon-Based Ambient Occlusion” [Bavoil et al. 2008] with a novel progressive sampling kernel disk. The performance framework around it is based on a 2 x 2 version of cache-friendly deinterleaved rendering, “Deinterleaved Texturing for Cache-Efficient Interleaved Sampling” [Bavoil 2014], and optional depth MIP-mapping “Scalable Ambient Obscurance” [McGuire et al. 2012].
Scaling quality with respect to performance is achieved by varying the number of AO taps (enabled by the progressive sampling kernel) and toggling individual features at various preset levels.
Stochastic sampling is used to share AO value between nearby pixels (based on rotated and scaling of the sampling disk) with a de-noise blur applied at the end. De-noise blur is edge-aware in order to prevent the effect bleeding into unrelated background or foreground objects, which causes haloing. Edges can be depth-only based, or depth and normal based. (The latter results in higher quality, but of course costs more in processing). This smart blur is performed in the 2 x 2 deinterleaved domain for optimal cache efficiency, with only the final pass done at full resolution during the interleaving (reconstruction) pass.
In practice, it is a multi-pass pixel shader-based technique. At High preset, the main steps are:
- Preparing depths
- 2 x 2 deinterleave input screen depth into four quarter-depth buffers and convert values to viewspace. Also, if input screen normals are not provided, reconstruct them from depth.
- Create MIPs for each of the smaller depth buffers (not done in Lowest, Low or Medium presets).
- Computing AO term and edge-aware blur for each of the four 2 x 2 deinterleaved parts
- Compute AO term and edges and store into a R8G8 texture.
- Apply edge-aware smart blur (one to six passes, based on user settings).
- Combine four parts into the final full resolution buffer and apply final edge-aware blur pass.
The Highest/Adaptive quality preset has an additional base AO pass used to provide importance heuristics that guide the per-pixel variable sample count for the main AO pass.
Table 1 gives an overview of performance numbers. These numbers are for reference and can vary based on driver and hardware specifics. Changing the effect settings such as 'radius' will not affect the performance, with the exception of edge-aware blur; increasing the number of blur passes will increase the cost.
|
|
Skull Canyon (Iris Pro 580) |
GTX 1080 |
RX 480 |
||
|---|---|---|---|---|---|
|
|
1920 x 1080 |
1920 x 1080 |
3840 x 2160 |
1920 x 1080 |
3840 x 2160 |
| Lowest | 1.4 | 0.15 | 0.59 | 0.35 | 1.43 |
| Low | 2.38 | 0.26 | 1.17 | 0.64 | 2.64 |
| Medium | 4.12 | 0.46 | 2.12 | 1.03 | 4.29 |
| High | 7.03 | 0.74 | 2.98 | 1.39 | 4.90 |
| Highest | 10.25 | 1.16 | 4.65 | 2.32 | 8.29 |
Table 1. ASSAO effect cost in milliseconds at various presets, resolutions, and hardware.
Profiled with screen normals provided, a two-pass blur and Highest adaptive target set to 0.45, getting the effect scaling (quality versus performance) between Lowest/Low/Medium/High/Highest presets is done by varying the number of AO taps, as well as by toggling on/off individual features. Table 2 shows a detailed setup of these presets.
|
|
Sample count |
2 x 2 deinterleaved |
Depth MIPs |
Edge-aware blur |
|---|---|---|---|---|
|
Lowest |
3 (6 in checkerboard) |
yes | no | no |
|
Low |
6 |
yes |
no |
no |
|
Medium |
10 |
yes |
no |
yes (depth only) |
|
High |
24 |
yes |
yes |
yes+ (depth + normals) |
|
Highest (Adaptive) |
10–64 |
yes |
yes |
yes+ (depth + normals) |
Table 2. Details of ASSAO presets.
Sample Overview
The sample uses DirectX 11 and is compatible with Windows* 7 64-bit and above, with Microsoft Visual Studio* 2015 to compile.
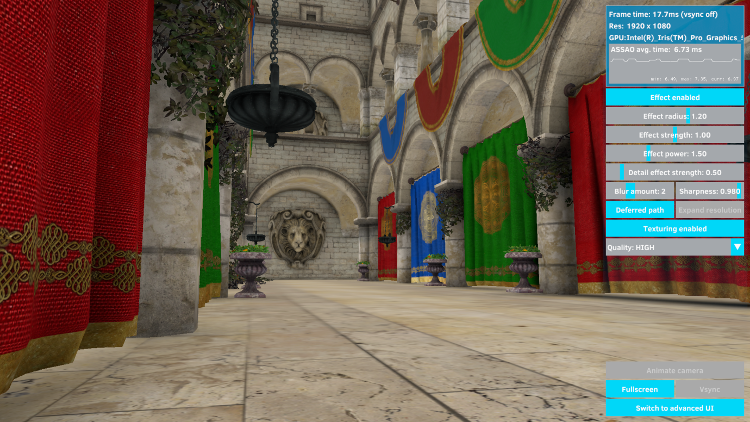
Figure 2. Adaptive SSAO sample layout.
The Crytek Sponza* scene included in the sample is used by default and the basic effect profiling metrics are shown in the upper-right graph. Below the graph, there are a number of dials used to change effect settings, quality, or debug the effect. The main settings are:
- Effect enabled
Toggles the effect off/on. See screen images 0 (off), 1 (on).
- Effect radius
Radius of ambient occlusion in viewspace units. See screen images 4, 5, 6.
- Effect strength
Linear effect multiplier, useful for setting the effect strength in conjunction with addition to effect power, as well as fading the effect in/out. See screen images 7, 8, 9, 10.
- Effect power
Exponential effect modifier:
occlusion = pow(occlusion, effectPower). The best way to tweak the power of the effect curve. See screen images 11, 12, 13, 14. - Detail effect strength
Additional two-pixel wide kernel used to add a high-frequency effect. High values will cause aliasing and temporal instability. See screen images 15, 16, 17, 18, 19.
- Blur amount
Higher number of blur passes produces a smoother effect with less high-frequency variation, which can be beneficial (reduces aliasing), but also increases cost. See screen images 20, 21, 22, 23, 24.
- Blur sharpness
Determines how much to prevent blurring over distance based (and optional normal based) edges, used to prevent bleeding between separate foreground and background objects, which causes haloing and other issues. A value of 1 means fully sharp (no blurring over edges), and anything less relaxes the constraint. Values close to 1 are useful to control aliasing. See screen images 25, 26.
- Deferred Path
In the deferred path, the inputs for the effect are screen depth and normalmap textures. Conversely, when forward path is used, only the depth texture is the input while the normalmap is reconstructed from the depth, which adds to the cost and produces slightly different results. See screen images 27, 28.
- Expand resolution
Near the screen edges the part that the effect kernel plays lies outside of the screen. While different sampling modes (i.e., clamp/mirror) can be used to achieve different results (see
m_samplerStateViewspaceDepthTap), the best solution is to expand the render area and resolution by a certain percentage while creating the depth buffer, so that the data needed by the AO effect near the edges is available. This option does that and ASSAO uses the optional scissor rectangle to avoid computing AO for the expanded (not visible) areas. See screen images 29, 30. - Texturing enabled
Toggles texturing to make the AO effect more visible (lighting is still applied). See screen images 31, 32.
- Quality preset
Switches between the four quality presets, described in Tables 1 and 2. See screen images 33, 34, 35, 36.
For the Highest/Adaptive preset, Adaptive target controls the progressive quality target that can be changed at runtime to quickly trade off quality versus performance. See screen images 37, 38, 39.
- Switch to advanced UI
To debug the effect in more detail, the sample can be switched to advanced UI, which provides access to additional scenes (see screen images 40, 41, 42) and the development version of the effect, which allows for more in-depth profiling and various debug views to show normals (screen image 43), detected edges (screen image 44), all AO samples for a selected pixel (screen image 45), and adaptive effect heatmap (screen image 46).
Integration Details
For quick integration into a DirectX 11 codebase, only three files from the sample project are needed:
Projects\ASSAO\ASSAO\ASSAO.h

Projects\ASSAO\ASSAO\ASSAODX11.cpp

Projects\ASSAO\ASSAO\ASSAO.hlsl
These contain the whole ASSAO implementation with no other dependencies except the DirectX 11 API.
The basic ASSAO integration steps are:
- Add
ASSAO.handASSAODX11.cppinto your project. - Add the
ASSAO.hlslfile where it can be loaded or, alternatively, see “USE_EMBEDDED_SHADER” defined inASSAOWrapperDX11.cpp(and the project custom build step) for details on how to easily embed the .hlsl file into the binary. - Create an ASSAO_Effect object instance after DirectX 11 device creation by providing the ID3D11Device pointer and the shader source buffer to the static ASSAO_Effect::CreateInstance(…). Don’t forget to destroy the object using a call to ASSAO_Effect::DestroyInstance() before the DirectX device is destroyed.
- Find a suitable location in your rendering post-processing pipeline: SSAO is often applied directly onto the light accumulation or post-tonemap color buffers, before other screen-space effects, usually using multiplication blend mode. A more physically correct approach sometimes used is to render the AO term into a separate buffer for later use in the lighting pass. In any case, since the required inputs are the scene depth (and screen space normals, if available), it means that ASSAO can be drawn once those become available.
- Set up the per-frame inputs structure by filling in the ASSAO_InputsDX11:
- ScissorLeft/Right/Top/Bottom are only needed if the effect output needs to be constrained to a smaller rectangle, such as in the case when the Expand resolution approach is used. Otherwise, defaults of 0 indicate that the output goes into the whole viewport.
- ViewportX/Y must be set to 0 and ViewportWidth/Height to the output render target and input depth and screen space normals texture resolution. Custom viewports are not (yet) supported.
- ProjectionMatrix must be set to the projection used to draw the depth buffer. Both LH and RH projection matrices are supported, as well as the reversed Z (http://outerra.blogspot.de/2012/11/maximizing-depth-buffer-range-and.html).
- NormalsWorldToViewspaceMatrix (optional) is needed if the input screen space normals are not in the viewspace, in which case this matrix is used to convert them.
- MatricesRowMajorOrder defines the memory layout of the input
ProjectionMatrixandNormalsWorldToViewspaceMatrix. - NormalsUnpackMul and NormalsUnpackAdd default to 2 and -1 respectively, and are used to unpack normals into [-1, 1] range from the UNORM [0, 1] textures that they are commonly stored in. When normals are provided in a floating point texture, these two values need to be set to 1 (mul) and 0 (add).
- DrawOpaque determines the blending mode: if true, the contents of the selected render target will be overwritten; if false, multiplicative blending mode is used.
- DeviceContext (DirectX 11-specific) should be set to the ID3D11DeviceContext pointer used to render the effect.
- DepthSRV (DirectX 11-specific) should be set to input depth data.
- NormalSRV (DirectX 11-specific) should be set to input screen space normals or nullptr if not available (in which case normals will be reconstructed from depth data).
- OverrideOutputRTV (DirectX 11-specific) should be set to
nullptror to the output render target. If is it set tonullptrthe currently selected RTV is used.
- Set up the effect settings structure defined in ASSAO_Settings. They are detailed in the Sample overview section.
- Call the ASSAO_Effect::Draw function. All current DirectX 11 states are backed up and restored after the call to ensure seamless integration.
The following files from the sample project provide an example of integration:
Projects\ASSAO\ ASSAOWrapper.h

Projects\ASSAO\ ASSAOWrapper.cpp

Projects\ASSAO\ ASSAOWrapperDX11.cpp
The latest source code can be downloaded from https://github.com/GameTechDev/ASSAO.
Citations
[Bavoil et al. 2008] Bavoil, L., Sainz, M., and Dimitrov, R. 2008. "Image-Space Horizon-Based Ambient Occlusion.” In ACM SIGGRAPH 2008 talks, ACM, New York, NY, USA, SIGGRAPH ’08, 22:1–22:1.
[McGuire et al. 2012] Morgan McGuire, Michael Mara, David Luebke. “Scalable Ambient Obscurance.” HPG 2012.
[Bavoil 2014] Louis Bavoil, “Deinterleaved Texturing for Cache-Efficient Interleaved Sampling.” NVIDIA 2014.
Notices
This sample source code is released under the MIT License